
![]()
Project owners, as well as account owners and admins, can create a GitLab integration so that commits, pull requests and branches in GitLab automatically attach to the appropriate stories.
Creating a new GitLab integration
If you are a project owner, or an admin or owner of the account that includes the project, you can create a GitLab integration for the project. Check the integration permissions for more information.
Adding a new GitLab Integration to a project
- Click the INTEGRATIONS tab in your project view.
- Select the Add an integration button at the top, then choose GitLab.
Configuring the integration
Next, you’ll need to configure the integration to work for one or more projects in your account.
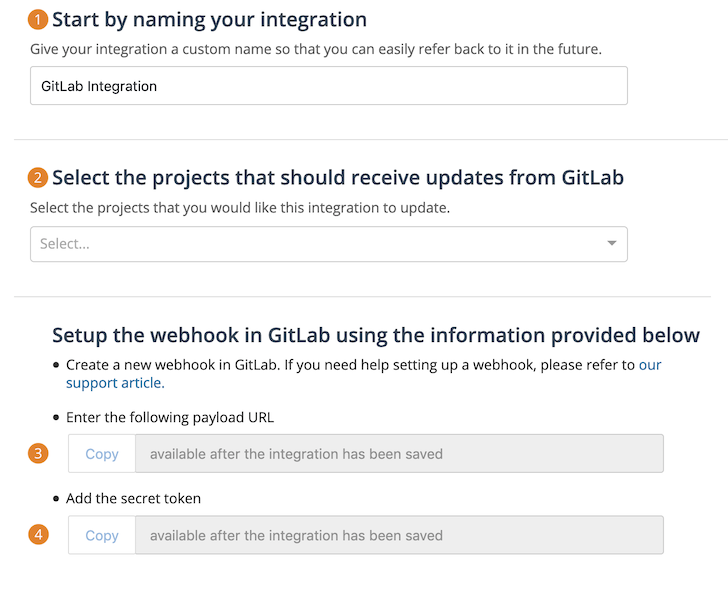
- Naming your integration: It’s important to name the integration so that it can be easily identified in the event it needs to be edited later. For example, “Frontend GitLab Integration”, etc.
- Pivotal Tracker Projects: You’ll need to pick which Tracker projects the GitLab integration can access. It is not necessary to set up individual GitLab Integrations for each individual project on your account.
- Webhook Payload URL: The payload URL is made available to you once the integration has been saved, and is the first of two pieces of information you will need to setup webhooks at the organization or repository level in GitLab. The other item you will need is the webhook “secret token” mentioned below.
- Webhook Secret Token: The “secret token” is made available to you once the integration has been saved, and is the second piece of information you will need to setup webhooks at the organization or repository level in GitLab.
Creating the webhook on GitLab
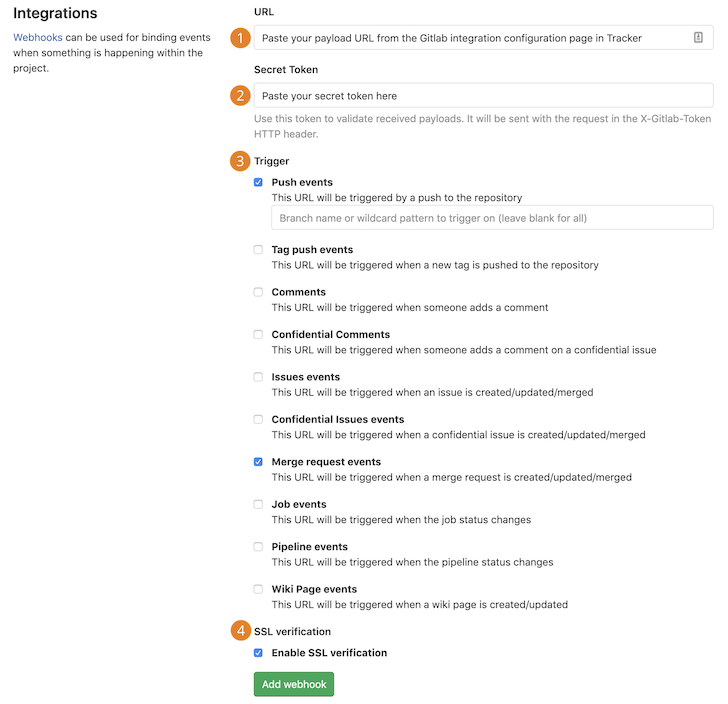
Navigate to the webhook creation portion of a repository or organization and fill out the form. You can also visit the setup form directly at links like:
https://gitlab.com/[owner_name]/[repo_name]/-/settings/integrations or
https://gitlab.com/groups/[group_name]/-/hooks
-
Payload URL: This can be obtained from the integration configuration page in Tracker as seen in item 3 above.
-
Secret: This can also be obtained from the integration configuration page in Tracker as seen in item 4 above.
-
Which events would you like to trigger this webhook?: At this time, the Pivotal Tracker Integration only requires the following events: Push events and Merge request events.
-
SSL verification: We recommend keeping this checked.
Using the GitLab integration: Branches
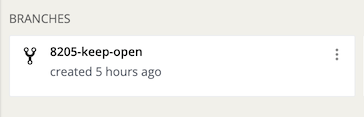
Attaching branches to a story automatically
If you create a branch from the command line and include the story id in the branch name, Tracker will automatically attach a branch to the story.
For example, creating a branch with the name 123123-super-cool-feature will attach it to the story with id 123123.
Using the GitLab integration: Pull requests
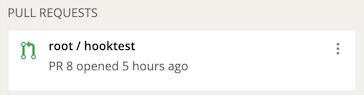
Tracker will automatically attach a pull request to a story if the name of the branch that is being merged starts with that story’s ID, as described in Attaching Branches to a Story Automatically above. The PR icon’s color will match its status in GitLab:

= Opened

= Closed

= Merged
Using the GitLab integration: Commits
If your project has a GitLab integration and webhook setup, you can also attach commits to a story’s activity/comment stream by using a commit message tagged with the story id. The syntax for your commit message is pretty simple. Add the Tracker story id with a preceding hash symbol within square brackets at the end of your commit message. Optionally, you can include a state change for the Tracker story within the brackets. Currently, there are two state changes supported: Finished and Delivered. For example, including “Finishes” or “Fixes” in your commit message will change the specified story to the Finished state, while “Delivers” will change the specified story to Delivered state.
[(Finishes|Fixes|Delivers) #TRACKER_STORY_ID]
The commit message in the example below adds a commit to story 123123 and changes story state to “Finished” with the “finishes” keyword.
git commit -m "[finishes #123123] Updated settings for holograph projector"
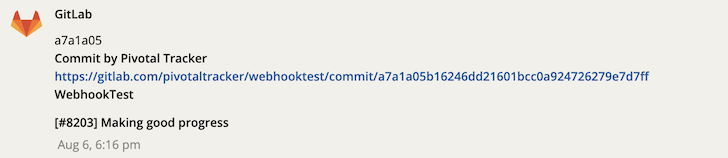
If you just fixed a CSS bug for story #109683950, your commit might look like this:
![]()
You can specify multiple story ids in a commit by separating each id with a comma or space, within square brackets. However, all story ids will show in the commit on all specified stories.
[#TRACKER_STORY_ID,#TRACKER_STORY_ID] or [#TRACKER_STORY_ID #TRACKER_STORY_ID]
Alternatively, you can place each story id in its on set of square brackets, and separate each set of brackets with a comma or space. This will prevent story ids from showing up in non-related stories.
[#TRACKER_STORY_ID],[#TRACKER_STORY_ID] or [#TRACKER_STORY_ID] [#TRACKER_STORY_ID]
Attaching GitLab resources to your story
You can manually attach GitLab resources to your stories using the CODE field. Simply paste in the GitLab link to your pull request or branch, and it will be interpreted and attached.

Managing GitLab integrations
An existing GitLab integration can only be updated by the project owner, account owner, or admin who created the integration. Account owners and admins can delete any GitLab integrations for projects in their account. Check the integration permissions for more information.
Troubleshooting Tips
We’re sorry that you’re experiencing issues with your GitLab integration, and hope the following tips and troubleshooting steps might help.
- Please make sure you’ve set up an integration for GitLab under INTEGRATIONS (as described in the Creating a new GitLab integration section above).
- The creator of the integration should make sure they’ve added all of the Projects and Repositories they expect to push and receive commits from in the GitLab Integration Configuration page (INTEGRATIONS).
If all of the above looks good, please consider the following:
- It is not necessary to set up individual GitLab Integrations for each individual project on your account. Any number of projects can be associated with any number of GitLab repositories and/or organizations in a single GitLab Integration, regardless of which project you chose to start setting it up from.
- Only project owners, as well as account owners/admins, can create new GitLab Integrations.
- Only the user who created a GitLab Integration may edit that integration. Account owners and admins may view and delete integrations that they did not create, but they can’t edit them.
If the above does not help, please email support@pivotaltracker.com with answers to the following:
- Is the issue to do with posting commit messages, attaching PRs or branches?
- The project(s) where the GitLab Integration(s) has been configured (preferably the project IDs).
- The project(s) that you are having the issue with.
- The story ID for a story where the commit message comment, branch or PR did not appear.
- The exact commit message, PR message or branch names that were used.
- The approximate time (including Time Zone) of the action.