
To create a new story in the Current, Backlog, Icebox or an Epic Stories panel, click the + Add Story icon at the top of the panel.

Alternatively, you can press the A key to add a new story to the top of the Icebox. The Add/View Stories panel for an epic also has the + Add Story button for adding stories with the epic label.
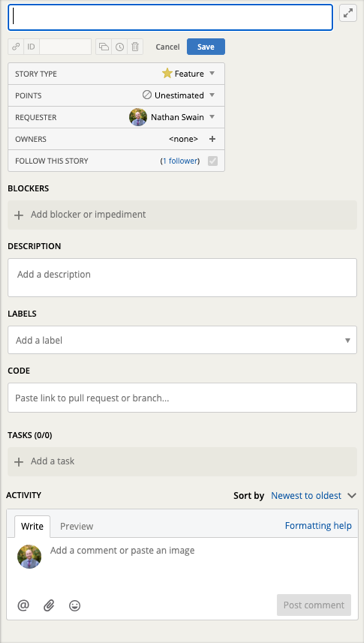
Clicking the + Add Story button opens a draft story detail window in the appropriate panel.
Location of newly added stories
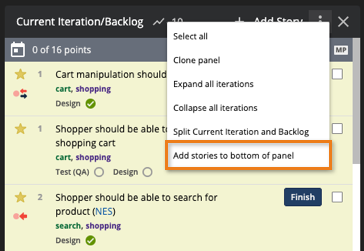
By default, newly added stories are placed at the top of the Icebox or in the case of the Current, Backlog or combined Current/Backlog panels; above all other unstarted stories.
If you’d prefer that new stories be placed below all other existing stories, you can set the default location to Add stories to bottom of panel from the Panel Actions menu at the top right of your Icebox, Backlog and/or Combined Current/Backlog panel. After you’ve created and saved a new story, you can then drag and place that story wherever you’d like.
Story types
In the story title, type a brief description of its purpose that is appropriate to the story type. These are the four types of stories in Tracker:
Features
![]()
Features are the default story type, and you can change your preferred default story type from your Profile page. Features are stories that provide verifiable business value to the team’s customer (e.g., “Add a Special Instructions field to the checkout page,” “As a shopper, I want to see my purchase history load in half a second so that I can find previously purchased items,” or “Add a new method addToInventory to the public API”). The delivery team gives each feature a story point estimate during iteration planning. Valid story states are unscheduled, unstarted, started, finished, delivered, accepted, or rejected. See the workflow overview for more on how stories cycle through different states.
Chores
![]()
Chores are stories that are necessary but provide no direct, obvious value to the customer (e.g., “Update SSL Certs”). Because they don’t typically require extra validation when they’re finished, the states for chores are just unscheduled, unstarted, started, and accepted.
Bugs
![]()
Bugs represent unintended behavior that can be related to features (e.g., “Login box is wrong color” or “Price should be non-negative”). Bugs have the same states as features.
Releases
![]()
Releases are milestone markers that allow your team to track progress toward concrete goals (e.g., stakeholder or investor demos, software launches, etc.). It’s possible to specify target dates for releases (more on those below). All stories for a milestone or release should go above the marker for it. Releases only have unscheduled, started and accepted states (Releases are automatically placed in the started state upon being created or dragged in the Backlog).
Filling in the details
Story title is the only required field, but you can and should add details in the Description. You can use a default or custom template for your story description. You can also add tasks in the story, such as a “to do “ list, testing notes, or to call out other activities such as design work. Add attachments such as UI mock-ups, design assets, or error output in comments in the Activity section. Markdown is supported in the story titles, description, comments, and tasks so that you can clarify information with elements such as bold/italic text, numbered/bulleted lists, code blocks, and images.
New stories are typically left unestimated until the delivery team meets to discuss them. Type in the Labels field to create a new label or choose an existing one, or click on the down arrow in the field to see and select from existing labels.
When you add a story, you become the requester by default. You can set that to any project member by clicking on the drop-down menu to the right. Typically, feature stories are requested by the product owner or someone else in a customer role, and that person will also do the final acceptance of the story. You don’t need to assign an owner to the story at this point. When someone starts the story, they will be assigned as the default owner. A story can have up to five owners (e.g., a designer and a developer pair).
Click the Save button just below the story title when you have entered at least a story title, or use the keyboard shortcuts CMD+S or CTRL+S. You can come back to a story and change any of its details later.
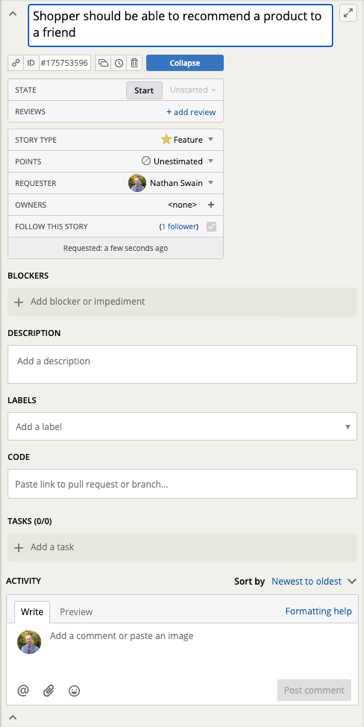
After saving the story, you can expand it again to see the story ID assigned to it. Note that the saved story now has a Collapse button. Learn more how changes are saved when you update a story.
If you are the story requester or an owner, you’ll automatically follow that story, meaning that you’ll get appropriate updates in email and in-app notifications. See Collaboration for more.